Take a peek at the dresser!

Here's a look at the dresser in it's original state. Simple, clean-lines.....not farmhouse style.

For those of you who haven't been following my dresser makeover, the above is a picture of how it looked before I got started. It is the Ikea Malm Dresser in Black/Brown. I found two of them on Craigslist for $40 each several years ago after seeing them at Ikea for much more. It worked well in my previous home because my house had that clean-line, upscale look to it. Since moving to this house and renovating it, the bedroom furniture seems a bit out of place. Since everything we are doing here is on the cheap, I had to reinvent my current furniture and give it that rustic, farmhouse feel. I love a couple of pieces I saw at Restoration Hardware and have been wanting to try milk paint sealed with a wax. I L-O-V-E the way my dresser turned out and can hardly wait to finish the room. I am already on the second dresser/nightstand!
Here are some finished pictures of the dresser. Instructions and a shopping list will follow.


If you were to purchase a similar piece from Restoration Hardware, you would pay $1,029! Of course, the quality would be superior to Ikea furniture, but that is simply not in my budget. I must confess that I actually enjoy having to think through how to create a similar look for less. Refinishing this piece has been so much fun and I love the final look.
This project cost me just $9.72 because I had everything except the trim for the drawer fronts. Remember the never-ending wood supply we bought off some guys on Craiglist? Wood from that pile was used as the top. The shiplap sides were leftover scraps from other projects. If you had to purchase these items, the initial investment would cost a bit more because some items only come in 4'x8' sheets, such as the plywood utility board. The utility board is $13.98/sheet at Lowe's. I believe it is called Luann at Home Depot and costs a couple of bucks less. The sheet of the utility board is enough to complete my entire bedroom project with a bit to spare. I had the stain, milk paint and wax on hand. If you had to purchase all these items it would cost a bit more. Although the makeover for all the furniture pieces in my entire bedroom will cost under $200, this dresser redo would cost you more if it is the only piece your refinish. Since I am spreading the cost for the stain, wax, milk paint, and utility board between all seven pieces, it significantly lowers the cost per item. You could choose a different type of trim for the drawer fronts or even purchased furring and used a router on them to get a similar look while saving money. This is one of many possibilities available. Use you imagination to find that unique look in your budget. If you watch Craigslist carefully, people often throw out used trim and baseboards. These could be salvaged and use on this furniture as well.
I didn't have time to get SKU# for you, so I will be adding my shopping resource list and Step-By-Step Instructions soon.
Today I was able to put on several coats of milk paint, distress and seal the dresser with a wax finish. I am attaching a couple of photos we took during the process so that you can get a sneak peak of my finale on the dresser/night stand tomorrow after church. The wax will have had time to dry a bit more and it will be ready to bring back into the house. The pictures were taken on an overcast day, some being in the garage under poor lighting. The distressing doesn't show up well on the picture where I applied wax. GORGEOUS. The Miss Mustard Seed milk paint added a very well worn finish to the piece, almost as if it occured little-by-little over time. The first three photos are comparing the stained finish before and after a coat of the milk paint. The fourth photo is of one drawer with three coats of milk paint. The final photo is of a first application of wax. ***You cannot see the distressing very well due to the lighting in the garage. When I brought the first finished drawer into the house, it was much more visible. The photos tomorrow should more accurately show the finish. Now onto dresser #2!


This distressed black vanity/dresser picture from Miss Mustard Seed the inspiration for this project. I spent a few hours today working to makeover my Ikea Malm dresser so I can give it this finish. (It is the small, three drawer dresser from this line.) I use it as a nightstand and have one for each side of the bed. They are fabulous for storage and just the right height to place a reading lamp.
I managed to add all the trim to the side except for the last piece on the bottom. To cut this piece required use of the table saw and it was raining most of the day. Pulling it out of the garage was impossible until it was dry and my husband was home. (My construction fairy took care of this for me without me even asking!) I think I will keep him. :)
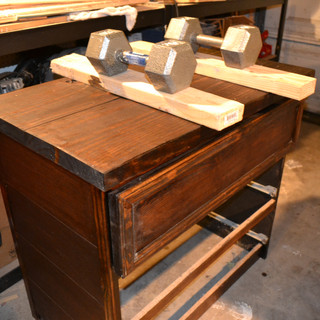
It is now stained and the top is glued down. When looking at the pictures below, please keep in mind the woodwork on the side and bottom are not finished. The entire piece will be painted using Miss Mustard Seed's Milk Paint in the color "Typewriter". It will then be distressed, totally changing its present look. I also plan to add simple black iron drawer pulls to finish it off. So, it is nowhere near finished, but getting closer. You can see from the first picture below how it looked when I started this project.
This is the distressed look I hope to acheive with the milk paint: