
Spring has been delayed this year. I must confess that I have not been disappointed in that my allergies have held off until this last week. Then BAM! Today I am spending time indoors and thought I would share with you my front porch perk up.
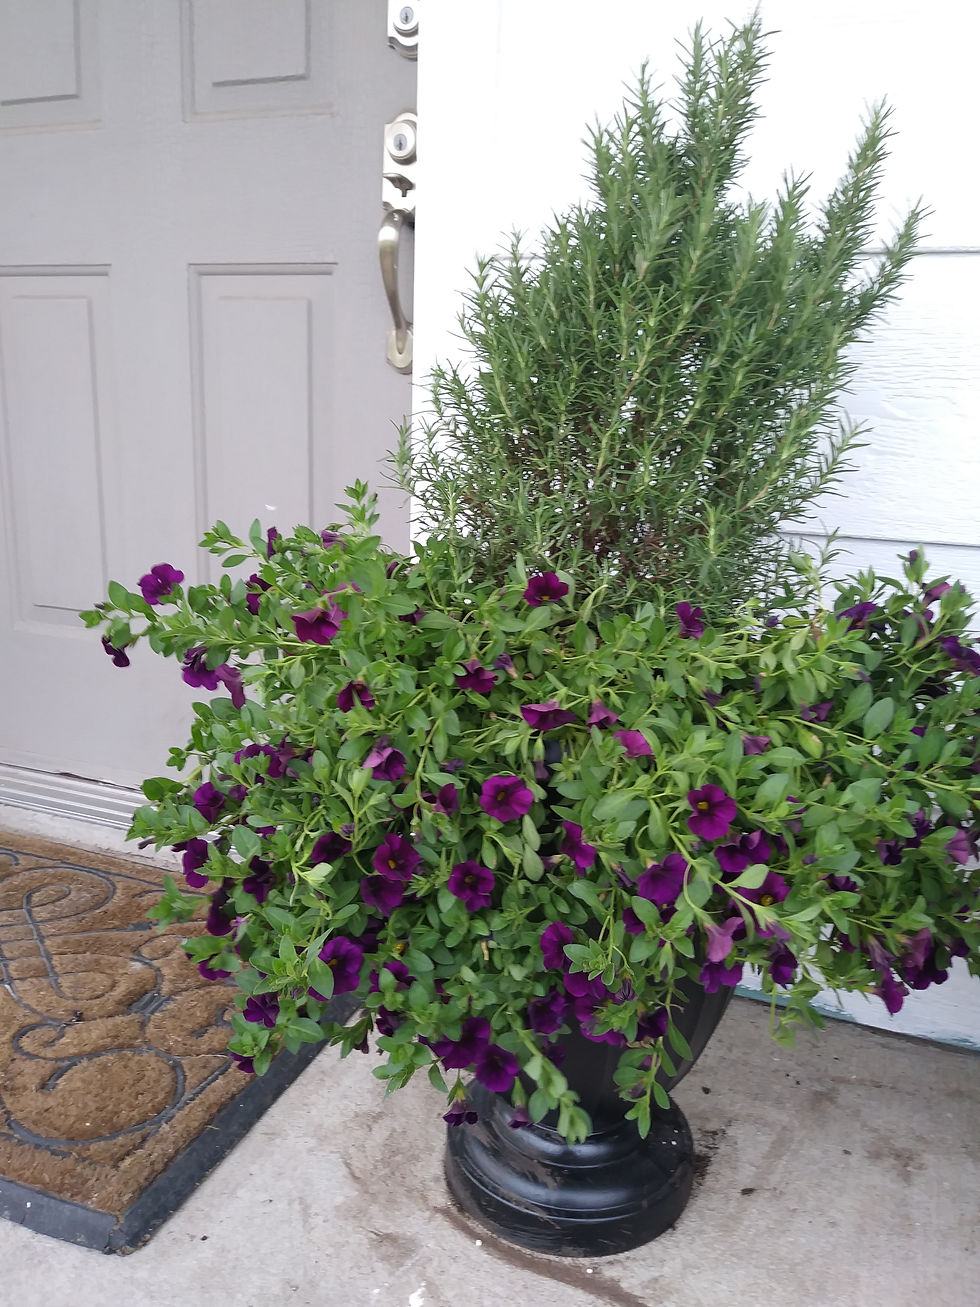
If you are like me, you enjoy seeing those urns filled with flowers spilling over the edge. I love the look, but boy can those be pricey! I cannot afford to change out everything each season, so... I decided to choose planters large enough to hold rosemary topiaries with room to grow and still allow for a pop of color spilling over the edge. Rosemary topiaries are great year round. You can plant pansies around them in winter, verbena or wave petunia during the spring, summer and fall or you can choose Calabrachoa like I did in my arrangement. These guys can handle a bit of heat, but they don't tolerate long hours of full sun exposure. They are perfect for transitioning to summer and give the look of a petunia, but with a smaller, more proportionate profile in a pot sized like mine.
Since these types of projects are an investment, I tried to choose pots that were timeless and a main plant that would survive for years. I set a budget of $100. I know, that sounds like a lot for two pots. It is! But, I invested in the pots and rosemary topiaries for long term/all-season use. I could not find pots that I liked in black, so I had to purchase bronze colored pots at Aldi and spray paint them myself. Here is the original color in the photo below. You can see that it was very plain and did not stand out against my white wood porch.

Finding Rosemary Topiaries is a bit tough this time of year. Many nurseries carry the wilder, free form plants, but not trained rosemary. There is one local nursery nearby that has them nearly year round - Homegrown Plants, Farmersville, TX. I love this place. To start, they carry everything you need to plant a beautiful flower garden, herb, or vegetable and the most amazing hanging plants. Their prices are almost always less expensive than any other nursery and they grown their plants on-site. I love this place and will take time in a future post to shoot some video of their shop.
They had the plain, cone shaped topiaries for $24.95 and the circle and diamond shapes for $29.95. It hard to tell in the photos, but these are about 2 feet tall. They carry flats of just about any flower you can imagine. The one that keeps catching my eye this year is the Calabrachoa. I never noticed this type of plant before and I am not sure how unless it is a newer variety. They come in the single flower version and a double flower which has a slightly fuller flower and no center cone. I chose the purple color because I felt it would really stand out against my white house paint. Plus, the bright yellow inside is an amazing accent. Home Grown plants carries these for $3.95/a small pot. I purchased a huge basket for $19.99 and it is so much fuller than buying them young and waiting all season for them to grow. I got larger plants and saved about $10. When you divide a pot, you have to be really careful when separating vining plants like these as they become tangled. Make sure to take you time and separate them carefully before digging them up to transplant. When the summer nears an end, I will simply replace the trailing flowers with something more appropriate for the season. Below are a few photos showing the basket before transplanting them, a close-up of the Calabrachoa flower and the finished project.


I posted a few photos on social media a while back and had a few people ask how I refinished my front door. Here is a close-up of the door. I painted it with a greenish gray chalk paint and rubbed on a coat of dark brown wax. The cold weather actually made the chalk paint crackle a bit, which ended up being a nice surprise. It was then sealed with a spray on clear coat that is UV resistant. Reminds me of old lead paint without the toxins. It has held up remarkably well and I just love it.
Sometimes the imperfections of a project actually end up making it better than what you originally had in mind. I hope this has inspired some of you to freshen up an old pot with paint, purchase a rosemary topiary or maybe add some color to a pot you already have. Happy late Spring y'all.
Updated: Dec 5, 2020
Life has been full of diversions lately. One of the more interesting project diversions has been the boy's bathroom renovation. First let me say, this really started in February of this year. (I know...) The tub was an almond color and looked dirty even when clean. For a quick and inexpensive update, we hired someone to Ceramicoat the finish. The tub and shower turned out well, for the most part. However, the countertop on the vanity was ruined and he wanted to charge us to come back out. For the price to bring him back, we could replace the existing vanity and countertop if I was frugal; and that I was...
I went online and trolled Craigslist looking for the perfect vanity that would add a bit of a clean-lined modern look while feeling right at home in a farmhouse bathroom. It had to provide plenty of storage and cost around $200. As always, the Lord provided. This spring, Kevin happened to be in East Texas over seeing some of his stores. That same day I decided to search Craigslist again. Then I got curious and expanded my search to include East Texas. One item popped up in the search. It was a brand new, $800 special order from Lowe's and was listed for $200. The catch was that it was in Marshall Texas, a bit out of his area, but not too far. With some working around schedules, Kevin and the owner were able to meet up and secure the deal! It has set in our living room for months and was only recently installed. I am so pleased with the results. The before and after with the green and blue shower curtain were part of my first blog for this project. Here are the After photos from when we were selling the home.


So before we get to the finished details, I have to tell you a little bit about what was done. First, the shiplap was cut and installed. To keep it clean, all the gaps were caulked. We considered the more rustic look, but using the sprayer would be the only way to paint the bathroom. That would not be possible because of the space constraints and ventilation. Plus, dusting the grooves to keep them clean would not be pleasant long term. I love the rustic look but would not like living with dirty, dusty walls. The door trim was cut, hung and caulked. All the walls and ceiling were painted in Valspar Du Jour white. I have used this color of white all over the house and love it in any lighting. It is a soft neutral white; every designers dream color. Believe me, I took forever to find the perfect white and this is it. The floor had been laid around the existing cabinet that we chose to paint when we moved in. After removing the cabinet, flooring had to be removed in spots and relayed. The toilet had been replaced by one a friend gave us. We found out why it was replaced... It would stain and was hard to keep looking clean. So, a beautiful, CLEAN, new toilet was installed. Then the vanity... I had purchased clearance faucets months ago and was so excited, but the holes on this vanity were VERY widely spaced, so you had to buy a special faucet to fit it. The light fixture was originally installed really low and we didn't change this when we changed the fixture. This was the perfect time to raise the lighting because shiplap covers a multitude of ugly drywall problems. Thankfully, my husband was able to raise the lighting. It worked with the white paint to really brighten the space.
Here is a picture in progress to show you the faux shiplap we made from ripping 4' x 8' sheets of utility board into 8" strips. The edges really must be sanded because it splinters a bit when cut. They are glued and nailed into place and Voila! Farmhouse look on a seriously inexpensive budget. The price is only $13 a sheet at Lowe's. Major change for a song and a bit of sweat. The entire project cost around $550 including all materials. I will update with more pictures of the progression and include a shopping list and prices for those interested.

Several things are still lacking on this project. The closet door needs to be painted and reinstalled. Shelves are being made for above the toilet and a towel bar is being made from an old pipe that Kevin had salvaged. I will post extra pictures showing the progress once it is complete. I just wanted to give a peek to those interested in some of the projects I have done.
Today I picked up a 1940's Duncan Phyfe Buffet/Sideboard to refinish. It is solid mahogany and has a bow front and concave doors. It will be a real beauty fit for any farmhouse. I will be listing it for sale with a number of other items I am currently refinishing. Check my facebook page for details.
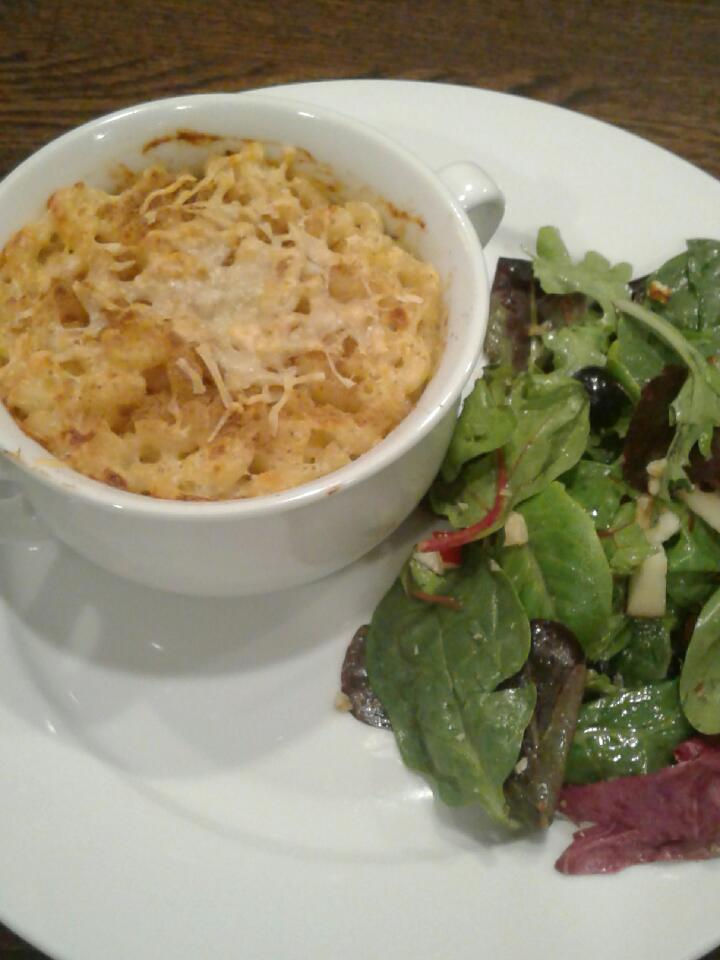
Who doesn't love a big helping of macaroni and cheese? With the advent of processed food, the practice of making your own from scratch has all but disappeared. From scratch meals are making a huge comeback as family's take back the dinner table from the spread of homework papers and bills to sit down eat... and talk. Macaroni & Cheese is loved by kids and adults alike. But, is it really faster to make it from a package? Not necessarily. Yes, grating the cheese can take some time, but with careful planning or buying freshly grated cheese you can shave off some of that dinner time mayhem. You may be wondering what goes into homemade Mac & Cheese? Very few ingredients compared to those listed on the package you may have in your pantry right now! Grab a pen to take down this list and you may find that you already have most of what is needed. Let's get started.
Note: This recipe yields approximately 10 servings. I try and make enough to have leftovers for lunch. For a family of 4-6, I would cut this recipe in half for a single serving.
Ingredients:
2 lb. bag of Elbow Macaroni
4 Tbsp. Butter
1/4 Cup All Purpose Flour
2 Cup Milk (Whole Milk or 2% is preferred, but any Percentage will do)
1 1/2 Cup Heavy Cream (No cream, No Problem. Use a total of 3 Cups Whole Milk instead and add another 1/4 Cup flour)
1 Cup Grated Parmesean (Reserve 1/2 Cup for Topping)
1/2 Cup Grated Asiago
1 Cup Grated Mild Cheddar
Breadcrumbs (Optional)
1 Tsp. Garlic Powder (Optional)
1/2 Tsp. Onion Powder (Optional)
1 Tbsp. Dried Parsley Flakes (Optional)
1/2 Tsp. Salt
Ground Pepper to taste (I prefer freshly cracked for that kick)
***Add Soft Fried Bacon for extra flavor (Dry off the grease and coarsely chop)

Essentially, you only need 5 things: pasta, butter, flour, milk and cheese! If you don't have the cheeses listed, you can use whatever you have on hand. I occasionally mix it up because I don't always have enough of each cheese available. It may be slightly different, but still delicious.
Start by preheating your oven to 350 degrees.
If using bacon, start by cooking it to a soft, but firm consistency. While it is cooking, you can grate the cheese and grease your baking pan. I usually prefer to cook the bacon on a cookie cooling rack sitting on a baking sheet with sides. This avoids the splatter of a skillet and drains the bacon as it cooks. it also frees up your time to prep the rest of the meal. I did not have bacon on hand to add to my pasta tonight. :(
If you plan to grate your own cheese, you can do this early in the week and have it ready to go at dinner. If not, it takes only a few minutes and can be done while you are preheating the oven and/or cooking the bacon.
Begin by preparing the macaroni. Cook until Al Dente. Be careful to keep it from over cooking. Drain Macaroni and set aside in stock pot. This step should be finished just before your cheese sauce is completed. Use the butter to grease the baking pan and reserve the remainder for the sauce.


For the cheese sauce, you will first add the milk and cream to a medium sauce pan and heat one medium-low. While it is warming, add the butter and flour to a small sauce and cook until smooth. Use low heat and stir constantly. This isn't a roux, so make sure to brown the mixture. You just want it to get smooth and thick. Once your flour and butter and blended, add to the milk mixture and whisk until blended, bringing it to a rolling boil. Reduce the heat to simmer and add the cheese stirring until smooth. Finally, add your spices and combine until evenly distributed. If you are adding bacon, you can add it in at this time.
Pour the Cheese Sauce into the stock pot with the macaroni, carefully stirring so as not to damage the macaroni (very important it's not overcooked so it will hold it's form). Transfer the mixture into the greased baking dish and coat with breadcrumbs and cheese. Bake for 15 - 20 minutes at 350 degrees. Turn your oven to broil and leave it until the top is has browned. Make sure not to leave the oven at this point because it browns very quickly. The top and edges will be lightly toasted and the inside will be creamy delicious.
*** If you have more time on your hands, you can make this using fewer dishes making cleanup easier. Cook and drain the macaroni. Transfer it to the pan you will use to bake it. Add butter to the bottom of the stock pot and melt it. Next add the flour and stir to prevent sticking until it is a smooth consistency. Add the cream and milk and bring to a rolling boil. Reduce heat to a simmer and add grated cheese and seasonings. Transfer the macaroni back into the stock pot and mix until the cheese sauce is thoroughly distributed. Lightly grease the baking dish with butter. Transfer the macaroni back into the baking dish and coat with breadcrumbs and reserved cheese.
Sometimes I want to do something extra special for dinner. Being blessed with pieces of white bakeware, I sometimes use a smaller casserole plus a few individual bakeware bowls so everyone gets their own. It's like being at a restaurant, except you have to cook it and clean it up...
I almost always serve Macaroni and Cheese with a salad. Any salad will do, but I prefer one packed with nutrition (especially when serving mac & cheese). Try a baby greens blend and a light dressing. Add nuts, berries or seeds to replace protein and nutrients not found in the mac & cheese. Our salad tonight had baby spinach and greens with organic apples, blueberries and walnuts. I used champagne Vinaigrette to pair well with the fruit. It gives it a light, slightly tart bite while not overpowering the flavor of the greens.


